May 082018
 

It’s been awhile.

Don’t look at me like that… It’s not like I’ve been out there winning beer competitions and brewing barrel after barrel of delicious homebrew while deliberately leaving you out of the loop.

Nah, man, it’s more like I lost my mojo. I gave up. I had a few false starts and would make some beer, but my heart wasn’t really in it and it didn’t take much to get me to cancel a brewday.

I have a refrigerator full of old yeast, a freezer full of hops pellets, and some old recipe kits I haven’t done anything with. My equipment sits unused and dusty. All remnants of what used to be a very fun hobby.

But, wait! For the first time in a long time, I actually want to brew again! I have ingredients on order for a batch this weekend and a bunch of new equipment I’m dying to break in.

The Hammer bought me some awesome stainless steel gear last year. The first item is the SS Brewtech Brew Bucket fermentor (Brewmaster Edition). I’m really stoked about this little guy — it replaces the lousy plastic buckets I’ve been using forever, the ones with the lids that have nooks and crannies you can never get the dried krausen out of. The ones I have to keep replacing over and over again. Finally, I have a real fermentor — easy to clean, easy to sanitize, racking arm, conical bottom for trub/yeast collection, and a thermowell I can use with my temperature controller’s probe to get better fermentation control.
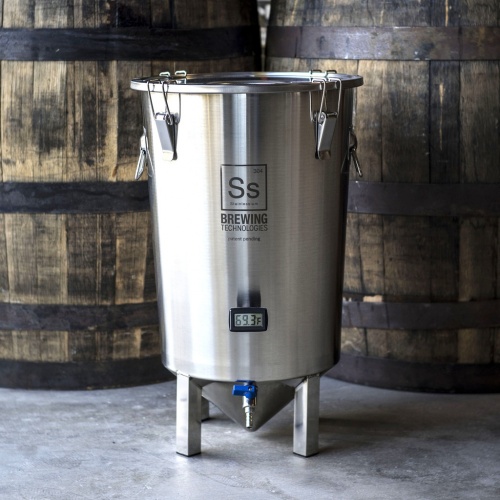
It’s just small enough to fit into my fermentation fridge, so I don’t need to change anything as far as that goes. Really looking forward to using this for the first time!

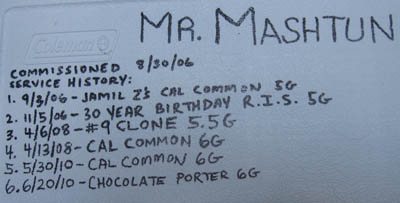
The second awesome gift was a SS Brewtech 10G InfusSion mashtun. Again, this is replacing old plastic — however, this time, it’s bittersweet, because it’s my old friend Mr. Mashtun who is being put out to pasture.
Mr. Mashtun

Mr. Mashtun

That’s right, Mr. Mashtun, made with my own two hands, along with two additional hands of my dad, commissioned way the f back in 2006, is retiring. I will never forget his service and his contribution to my progression into all grain brewing. However, when I look at what the future holds I can’t deny that we are making some serious progress here…
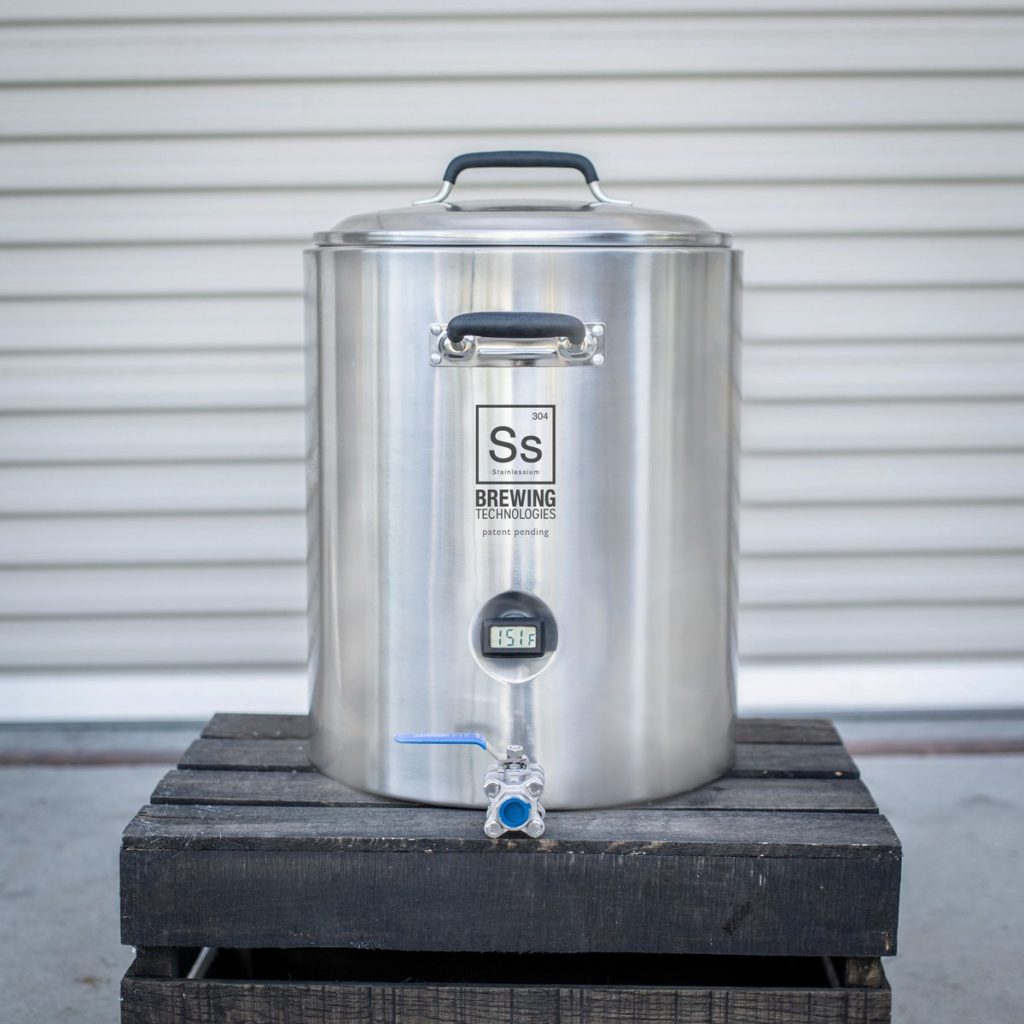
I’m really excited to see what impact this new mashtun has on my efficiency numbers…I’ll still be batch sparging for the time being, but this might even get me experimenting with fly sparging. SS Brewtech makes a pretty nice add-on sparge arm, but I’m going to wait until I have a few brews under my belt first.

I’ll be brewing up an old favorite, the Engine 97 Steam Beer I adapted from Jamil Zainasheff’s famous California Common recipe. Wish me luck, and hopefully I’ll be seeing you around here a little more often.
May 232011
 

The biggest problem I’ve had to date with my brew system is water management. When you do partial boils, this problem never rears its head – you brew a few gallons of wort and just top off with water to get to your final volume. Easy peasy. When you start doing all grain mashes and full boils, however, you need to back into the amount of water to use, taking all sorts of factors into consideration. What is your evaporation rate during the boil? How much water does your grain absorb? What about cooling losses, liquid left in tubes, and deadspaces in kettles and tuns? It’s enough to drive a man mad.

Last year I focused on trying to pin down my exact water usage. First I tried using dipsticks. Then I tried weighing the water. I used various pitchers and containers to measure but the end result was always the same – small inaccuracies in my measurement methods would add up and I would end up missing my targets completely. The only thing consistent about my brewing setup was its inconsistency.

However, all of this data I gathered did help me find a pretty narrow range for things like grain absorption and evaporation rates. I was getting very close to the answer – now I just needed an accurate way of measuring the water.
 

Neptune T-10 water meter

Neptune T-10 water meter

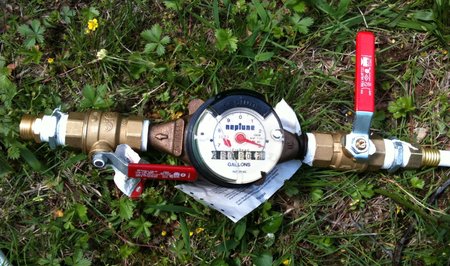
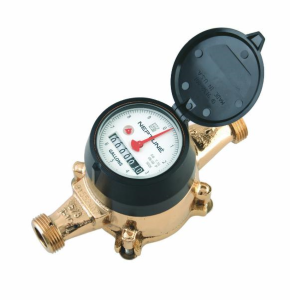
Meet the Neptune T-10 residential water meter. The T-10 is supposedly optimized for accuracy during low-flow situations, which made it a perfect choice for my brewing applications. I picked this bad boy up from eBay last year, and finally got a chance to hook it up and give it a whirl. The goal was to find a way to hook up the T-10 to my hose spigot in the backyard. If this worked, I would have a way to measure the water I was adding to the system without having to use pitchers, scales, or (insert other time-consuming and frustrating methods here).

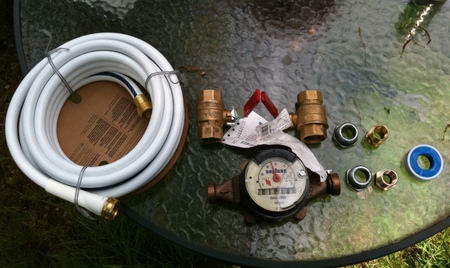
I ran off to a large, orange hardware store to look for the fittings I needed. It took two plumbing guys and about 30 minutes to find something that would fit the T-10 – the first few adapters they picked out didn’t seem to thread properly. I finally walked out with two 1″ ball valves, two 1″ to 3/4″ bushings (luckily, I noticed they picked out black pipe and swapped them out for galvanized – black pipe shouldn’t be used for drinking water applications), two garden hose adapters, and a white camper hose rated for potable water.

Fittings for the T-10 water meter

Fittings for the T-10 water meter

I applied a generous wrapping of teflon tape, screwed everything together, and hooked it up to the spigot. Much to my surprise, this Frankenmeter actually worked! I was able to measure out my strike and sparge water in a fraction of the time it used to take me, and some quick tests with a half gallon pitcher showed the accuracy was good enough for my purposes. The only complaint I have is that the odometer-style gauge on the front (which measures 10s of gallons) obscures part of the clock-style gauge that runs around the face of the meter (which measures fractional gallons, and is what I use). A Sharpie and ruler should remedy this easily enough, but it would be nice if I didn’t have to do that.

All hail mighty Neptune!

All hail mighty Neptune!

I view this experiment as a success – not only will the Neptune help me achieve greater accuracy in my measurements, but it is also going to save me a significant amount of time each brewday. It wasn’t cheap ($40 for the meter and $40 for the fittings, although I really only needed one ball valve) but the benefits definitely outweigh the costs.

Aug 182010
 

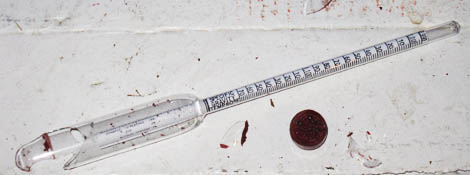
My first hydrometerWell, it was bound to happen eventually.
That picture is of my very first (and only) hydrometer. I got that in the starter kit I bought over five years ago, when I began this long and crazy descent into brewing madness. Over the years, I’ve treated this thing with kid gloves – especially as the time and brew sessions kept adding up. “How cool would it be,” I mused, “to still have that original hydrometer, that connection to my humble beginnings, forever?”

I had planned to eventually retire it, perhaps mount it and hang it over that bar I’m going to build one day. I daydreamed about its last task being the measurement of my first professional wort’s gravity. It served me very well throughout the years, and today, it is no more.

My dear wife accidentally dropped it today when she was helping me clean up some of my brew gear. She feels horrible about it – she knows how much that hydrometer meant to me – and she’s keeping the pieces to make some sort of tribute or memorial to my trusty friend. Perhaps it will still find its rightful place in my personal brewing museum, as time keeps marching on and I try and make this less of a hobby and more of a profession.

However, as I think about it, I can’t be that sad. After all, it’s just a hydrometer – an easily replaceable tool, and one which I have been considering replacing with a refractometer for some time now anyway. When I stop and think about what’s really valuable, what’s been with me since the very beginnings of my brewing journey and what has always encouraged and supported this passion of mine, it’s my wife.

She took me to my first brewery tour at Harpoon in Boston, and we brewed our first beer together. She came with me to pick up the kit, to learn how to use that tricky hydrometer for the first time, and to drink that brew which was the best beer I’d ever had because I had made it myself. And she has put up with the never-ending array of gadgets, freezers, buckets, and CO2 tanks which have taken over our home. She encourages and inspires me, and I truly think that helps me brew better beer more than any tool could.

So, rest in peace, hydrometer. You served me well, and you will not be forgotten. I raise a glass to you tonight – to brews of the past, and the brews of the future you will not be there to measure. However, I shall not be sad, for I still have the really important things in life, and to lose sight of that would be the real tragedy here.

Jun 212010
 

Mr. Mashtun

Mr. Mashtun

If you’ve been keeping up with the blog, you know I’ve been trying my hardest to pin down efficiency losses in my system. I started keeping meticulous records on water in and wort out numbers, going as far as weighing the liquid to be as accurate as possible. When my last brew session clocked in with an efficiency in the mid-50’s, I decided to try changing my mill.

Up until now, I’ve been milling my grain with a Corona (aka Victoria) mill. This is a cheap mill made for grinding corn into flour for tortillas, not necessarily for crushing malt for brewing. There are some die-hard Corona mill supporters out there, claiming they can regularly get in the 80% efficiency range, but I never felt it gave me a good crush. In my experience, it was horribly imprecise, either spitting out uncracked grain or pulverizing both husk and kernel into flour. Add to that the small hopper and manual hand-crank operation, and it was time for a change (yes, you can motorize the Corona fairly easily, but I didn’t think it was worth the effort). I’m not doubting that people get good results with the Corona, but for me, it was too little, too late.

I did a bit of research, and wound up ordering a Barley Crusher mill. This is a highly rated, fairly inexpensive grain mill with two knurled steel rollers designed especially for brewing. I took advantage of the discount pricing BeerSmith is offering and ordered the 15 pound hopper model for $154 (with shipping). When the mill arrived this week, I was excited to try it out for this weekend’s brew.

In a word: amazing. The Barley Crusher took a little adjusting to – I ran a half pound of grain through to break it in, per the instructions, with no issues. Using a power drill which easily attached to the crank, it took about three seconds. However, when I loaded the hopper with 10 pounds of pale malt, the rollers wouldn’t grab the grain and just spun uselessly. A quick search online showed this isn’t an uncommon problem, but one that is easily solved – by loading the hopper with one scoop of grain first, I was able to “prime” the rollers and once they caught, I was free to load the hopper to capacity.

What would have taken me the better part of an hour with the Corona took no more than three minutes with my DeWalt drill and the Barley Crusher. More importantly, however, was the look of the crush – the kernels were all cracked nicely, but the husks were still intact – perfect for setting a filter bed in the mashtun. I crossed my fingers, hoping this would boost my numbers a bit.

I noticed a difference during sparging and lautering – my wort ran clear faster, and I had no hint of a stuck sparge. I measured my pre-boil efficiency and came out over 75% – about a 20% boost just from changing one piece of equipment! Now, my brewhouse efficiency (true efficieny, into the fermentor) dropped quite a bit, but that was due to excess wort losses – I had trouble racking into the fermentor due to a clogged bazooka screen in the kettle (using whole leaf hops without a hop bag = dumb). At the end of the brew, I clocked in at 5 gallons of 1.060 OG wort when I was expecting 6 gallons of 1.061. The volume difference killed my brewhouse efficiency, but my recipe was calculated at an estimate of 70%, so it all balanced out in the end. I’m happy – my last brew came in 18 points under gravity, so this is a major improvement!

I will keep chasing my numbers and reporting back here – if I want to start formulating my own recipes and brewing to consistency, I need to dial in my system exactly. That means getting good sugar extraction from my mash, figuring oiut my evaporation rate, and determining exactly how much water/wort is lost to grain absorbtion and tun/kettle deadspace.

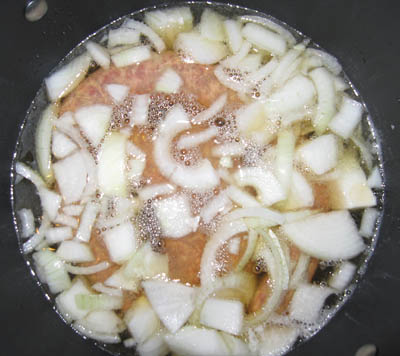
The Chocolate Porter is in the fermentor happily bubbling away (at 68°F, innoculated with the WL San Francisco Lager yeast I cultured from the last batch). I used my new Thomas Fawcett & Sons Halcyon pale malt as the base, and I am expecting nothing short of greatness from this batch! I am also proud to announce that during the mash, I grilled up some traditional Wisconsin-style bratwurst. Below is a picture of them simmering in beer and onions before moving to the grill.

Simmering bratwurst

Simmering bratwurst

The wort sample from the porter tasted dead on, the bratwurst were delicious on a toasted hero with raw onion and brown mustard, and it made slaving away over propane burners in the sweltering heat worth it. Nothing says summer like mixing a brewday with some grilling! Next week, I hope to knock out a new version of the California Common recipe while smoking some of my (semi)famous pulled pork. Speaking of smoking, I have plans to smoke some grain to create a cherry-smoked Hefeweizen and a classic Bamberg Rauchbier.

Tell me about your most recent brewday, your battles with efficiency, and your favorite sausages!

Coming soon, on lootcorp: my new chest freezer, why new beer site BrewAdvice.com needs our help, how to wire up a Ranco temperature controller and save some money, and lootcorp.com’s very first iPhone app!

Prost!

Jun 012009
 

Blichmann Engineering's BeerGun

Blichmann's BeerGun

With my newfound desire to enter my beer into some competitions, I needed a way to get it out of the kegs and into bottles. I’ve been messing around with filling growlers and trying out a Carbonator Cap for homebrew portability, but I wanted a way to bottle my beer that would preserve the quality and allow me to send some off to the judges. Enter the BeerGun by Blichmann Engineering.

Are any of you using this beast? It’s supposed to be the pinnacle of draft-to-bottle technology.

For those unfamiliar with the issues of going from keg to bottle, beer will foam when exposed to rapid pressure changes – this makes filling bottles from a pressurized keg difficult. The only real solution used to be counter-pressure bottle fillers, which are unwieldy contraptions that pressurize the bottle and allow you to fill it without the beer foaming all over the place. The BeerGun is supposed to be a much more elegant solution, gradually reducing the pressure of the beer and allowing for one-person operation.

It should be here in a couple of days, and I’ll be sure to post a full review once I get a chance to use it. I’ve already missed the NY State Fair competition deadline, so I’ll have to check the AHA/BJCP calendar and see what my next target is.

May 172009
 

Let me just say, corny kegs are awesome. Not only do they make racking days a piece of cake, they apparently have mystical powers which protect and nurture your beer.

I needed to get ready to keg the Old Speckled Hen clone I brewed up a couple of weeks ago. I had some kegs from last summer sitting in the chest freezer – an almost-kicked boysenberry wheat and a few gallons of my RyePA (Pale Ryeder). It had been almost a full year since I had tasted either of these beers, and I was expecting them to be long past spoiled.

I tasted the Pale Ryder first, figuring it would have held up better against the ravages of time. Indeed, the beer tasted fine – great, even. Perfect carbonation level, good balance, just a touch of that heavy, almost syrupy mouthfeel found in Imperial IPAs. I enjoyed a quick sample and turned to the other keg…the wheat beer. There was no way this beer was still good. I braced myself for the unpleasant task of cleaning out the keg and dragged it outside.

I dispensed a little beer and sniffed it. It smelled OK. Ah, you only live once, right? I gave it a taste…and it was delicious!! I immediately dispensed the remainder of the keg into a pitcher, shocked that the beer had held up so well. I see it as a sign my sanitation and racking procedures are OK. What’s the longest you guys have kept a beer in a keg?

In other corny news, I kegged the Old Reckless Hen tonight, and it tasted pretty good out of the primary – can’t wait to try it with some carbonation. I’m going to enter the Old Reckless Hen, the new wheat beer that’s almost ready, and, why not, some Pale Ryder to the NY State Fair. This will be my first competition, so I’m excited to see what kind of feedback I get. I’ll let you know!

May 212008
 

I’ve been toying with the idea of a mash recirculation setup for my system recently. Using some sort of mash recirculation system gives you much finer control over mash temperatures. In an infusion mash, the kind I do now, the temperature of the grain and the ratio of water to grain are plugged into brewing software (or thermodynamics equations if you’re wiggy like that) to calculate how hot your strike water needs to be to achieve your desired mash temp. For example, 10 lb of grain sitting at 72°F with a 1.25 qt/lb ratio would require 166°F strike water to achieve a mash temp of 154°F, according to BeerSmith.

The problem with this process is that it can be pretty tough to hit your mash temperature exactly. If you brew enough on the same system, you can tweak your process until you nail it pretty consistently, but there will always be hot and cold spots in the mash which makes getting an even temperature across the entire mashtun difficult. I’m usually off by a degree or two – not a huge deal, but it does add some variance to my brew sessions. Even if you do manage to hit your desired temperature exactly, the mash is going to cool over time. My mashes typically last one hour, and I’ll see a temperature drop of anywhere from one to five degrees using a converted Coleman cooler as my mashtun – more if the ambient temperature is really cold.

Now, this isn’t the end of the world, and for many homebrewers it won’t even be a concern. However, if you are looking for exacting control over the mash process, recirculation is the way to go. I see several benefits to using a mash recirculation system:

  • the mash temperature can be raised in step mashes without additional water infusions
  • the mashout temperature can be reached without additional water infusions
  • the strike and mash temperatures can be easily reached and accurately maintained throughout the entire mash
  • an even temperature can be maintained across the entire grain bed

However, there are also some drawbacks. Mash recirculation requires extra equipment, like a pump and a heating element. It also makes your setup that much more complicated – the more moving parts and steps in your process, the more likely something will go wrong at some point. So the question seems to be: Do the pros of mash recirculation outweigh the cons? That very debate has been hashed to pieces in brewing forums across the globe.

Personally, I’ve never had any problems doing plain old infusion mashes. To go buy a pump and rig up a heat exchanger seemed like a solution looking for a problem. However, I now own a March pump (which I find indispensable during the brewing process) and I’m always looking for new ways to use it. Also, as I tackle more difficult and delicate beer styles, such as Kölsch and other light lagers, I can appreciate the benefits of more precision during the mash. So, I’ve decided to revisit the idea of recirculation, while trying to keep it as simple as possible.

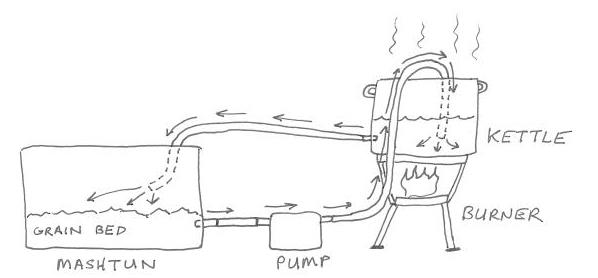
I’m not sure if this will work the way I hope, and I can’t even take credit for the idea – it came from a thread on Morebeer’s forums, where the author described a method his homebrew club uses to reach mashout temperatures during their brews. Basically, it’s a poor (or lazy) man’s RIMS setup, using the boil kettle to apply direct heat instead of a heating element. The pump pulls wort from the mashtun and pumps it into the heated kettle, with the idea that the whirlpool action the pump’s output creates will keep the wort moving and avoid any scorching. The wort is then gravity-fed from the kettle’s spigot back to the mashtun (see diagram below). Temperature feedback is provided via thermometers placed in the kettle and mashtun, while careful use of the kettle burner heats the wort to the proper temperature. The output flow of the pump can be restricted to match the output flow of the mashtun, keeping the system in balance and the level of wort in the kettle constant.

Diagram of cheap mash circulation idea

This lacks a lot of the automation and precision of a true RIMS or HERMS design, but I think it would be more precise than infusions and doesn’t require any additional equipment. I see a few potential problems that may need ironing out:

  • will I need a sparge arm to evenly distribute the recirculated wort over the grain bed, to prevent channeling and inconsistent temps?
  • any possibility of hot-side aeration? (I don’t really believe it’s a problem on the homebrew level, but can’t pass up the opportunity to freak out the HSA fear mongerers)
  • will a stuck sparge/clogged manifold be more of an issue than usual?
  • how difficult will it really be to maintain a steady temp using the direct heat method?

Obviously, this needs some empirical testing to see how well it works, but I am optimistic. I will perform a few experiments next week and report back with my results. Eventually I’d like to go to a real HERMS system, but I’m a ways off from that and this could be a nice compromise.

Note to novice brewers – don’t worry about all of this yet. Having a recirculation system will not replace actual skill and magically produce great beer, just as not having one will not prevent you from making great beer. In fact, I eschew any kind of automation until you have your basic skills down.